Appearance
CI (Continuous Integration) with GitHub Actions
Last Updated: Dec 7, 2024
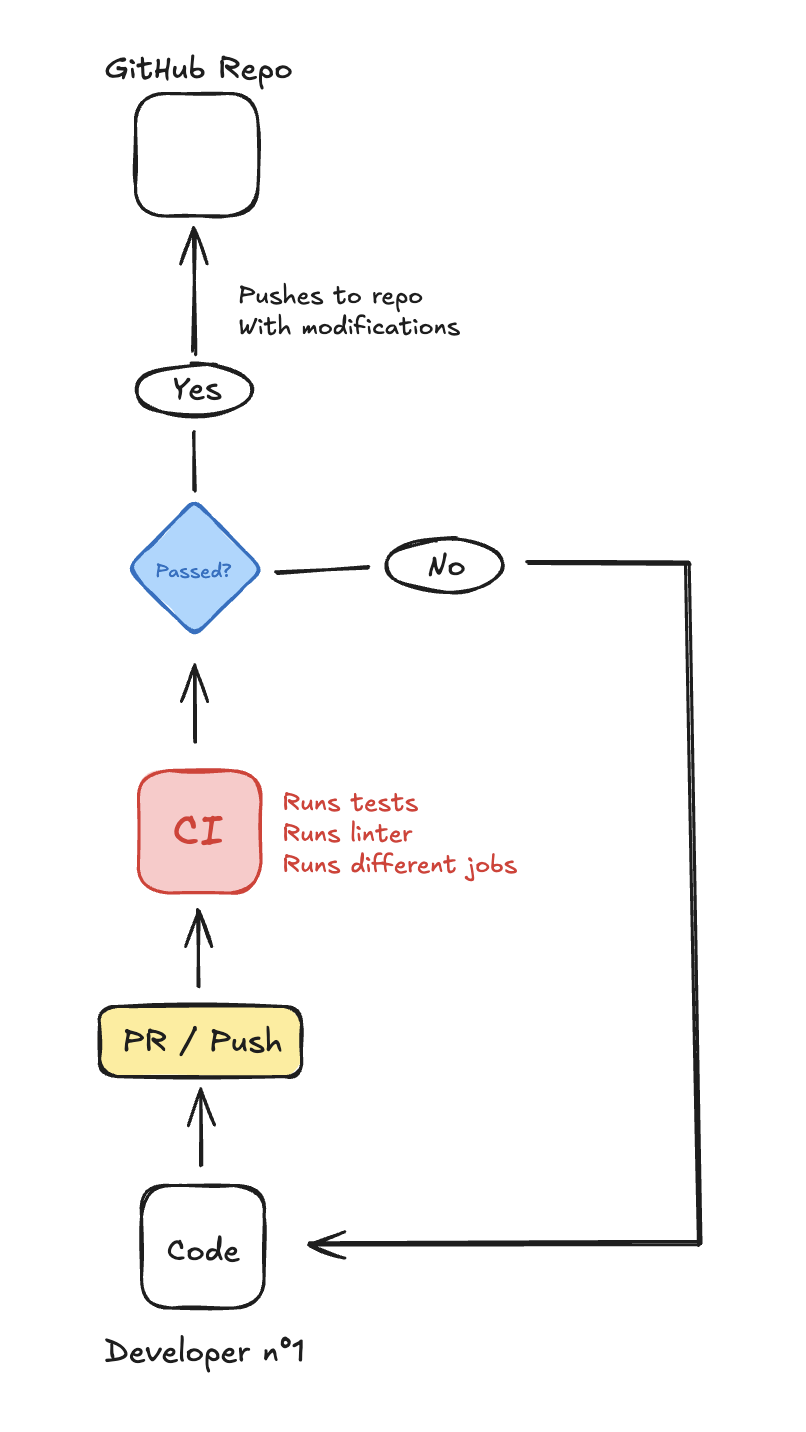
The Continuous Integration is an automated process that verifies and validates the source code automatically with each modification in the repository (push or pull request). It enables quick error detection before the code is merged into the branch.

GitHub Actions
Will we be using GitHub Actions to implement a CI into a Github repository. But first, what is Github Actions?
GitHub Actions is a CI/CD (Continuous Implementation and Continuous Deployment) tool integrated directly into GitHub, allowing developers to automate tasks and workflows around their code. With this tool, you can build, test, and deploy your code automatcally is response to events in the repository, such as pushes, pull requests, etc.
CI Implementation
INFO
In this note, we will follow the example of implementing a CI that will run a linter over the code, to check any type error or such. This example applies for any kind of CI! You must adapt to your needs.
Creating a the CI file
First of all, you will need to create the .github folder, with its workflows subfolder:

After creating your two folders, you can create any YAML file, for example, let's create a swiftlint.yml file, so when my CI starts, it will lint the entire code and check for errors.

So, what's happening here? When you will interact with your repo (e.g pushing the code), GitHub Actions will check if there is any .github/workflows folder. If so, it will automatically run the YAML file inside. This means you can create different YAML files to run different jobs such as unit test, lint, etc.
WARNING
Double-check your YAML indentation! YAML syntax is sensitive to spaces, so each level of indentation must be consistent. Even a small indentation error can cause the CI workflow to fail unexpectedly. Make sure each nested element aligns correctly, especially under jobs, steps, and other sections.
swiftlint.yml
Let's dive into this file, and see the different steps we need to do.
yaml
name: SwiftLint

on:
  push:
    branches:
      - main
  pull_request:
    branches:
      - main
Breakdown of the CD Workflow
Configuration
- The
nameparameter corresponds to the name of your CI. - Triggers
onDefines when the CI is triggered.push: Each time you push code to themainbranch, the CI is activated.pull_request: Each time you PR is opened or updated towards themainbranch, the CI is triggered.
Jobs
yaml
jobs:
  lint:
    runs-on: macos-latest

    steps:
    # Step 1: Check out the code
    - name: Checkout code
      uses: actions/checkout@v3

    # Step 2: Set up Node.js (if needed for a static site generator or build step)
    - name: Set up Node.js
      uses: actions/setup-node@v3
      with:
        node-version: '20'

    # Step 3: Install swiftlint
    - name: Install SwiftLint
      run: brew install swiftlint

    # Step 4: Run swiftlint on the project
    - name: Run SwiftLint
run: swiftlint- Jobs
jobsDefines a set or tasks executed in the workflow.- Here, the job is named
lint, meaning it will perform code checks. runs-onis like an image on docker, it will use the image to emulate a specific environment.
- Here, the job is named
DANGER
Careful! I am using the macOS environment since Swift is specific to macOS, it needs to run on a compatible system. You can use ubuntu-latest for any other kind of system!
- Steps
stepsare the different milestones it's going to take in order to run the job.- Step 1 - Checkout code: Checks out the code to the runner.
- Step 2 - Set up Node.js: Ensures Node.js is available, useful if the project needs a build step.
- Step 3 - Install SwiftLint: Installs the linter.
- Step 4 - Run SwiftLint: Executes the command
swiftlint.
WARNING
Even though SwiftLint doesn't need Node.js, this step garantees that the environment uses Node.js in case of tools or dependencies that will need it.
Conclusion
By implementing Continuous Integration with GitHub Actions, we’re making code validation more efficient and ensuring a healthier codebase. This setup helps catch errors early, improve code quality, and streamline the development process. From configuring triggers to defining jobs and steps, we’ve covered how to set up a basic CI pipeline that can be tailored to any specific needs.
To explore the full YAML configuration and see the code in action, you can visit the GitHub repository. Feel free to clone, adapt, or extend it to fit your own workflows.
